
NFS3:HP introduced the option for multiplayer games in split-screen (on the same PC) and the all-new "Pursuit Mode". Besides, additional cars were available for download from the official site. Like its predecessor NFS2SE, it was optimized for use with 3dfx graphics cards, though it also included support for Direct3D cards. Unfortunately, the number of D3D cards it supports is very small, unrecognized cards being called in a generic way "Direct3D Device 1". That means you'll either have to use software rendering mode or a Direct3D mode in a low resolution (from 320x240 to 800x600, at 16 bits depth). So here are the solutions I've found so far.
The first step:
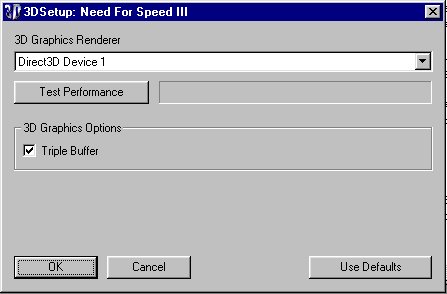
If you install NFS3:HP as it comes and then run the 3D Setup utility, which you can find opening Start/Programs/Electronic Arts/Need For Speed III/3D Device Setup, and select the "Direct3D Device 1", you'll get a warning message, and besides, you won't be able to check the "Triple Buffer" option. So what do we do?Well, go to the 3DSetup subfolder (inside the NFS3 installation folder), and open the 3ddata.dat file with your favorite text editor. You'll find a line which reads "Triple Buffer=0", simply change that to "Triple Buffer=1".
You can also change the line "Test=0" to "Test=1", if you wish. Then save the file back to disk. Now when you run the 3D Setup utility and select the "Direct3D Device 1", the "Triple Buffer" option will be available for checking. Feel free to test your settings by pressing the "Test Performance" button. Click on the image to the right to see what it should look like.
After you do this, press the "OK" button and you're almost ready to start the game.

The second step:
So, what do we need to do now? Well, you could start the game, but you'd still only be able to get resolutions of maximum 800x600. What we need to do is fool the program into thinking it's using another card, so it offers you higher resolutions. The easiest way is to simply go into the main NFS3 installation folder and rename the voodoo2a.dll to something else or delete it completely. Then you make a copy of the d3da.dll file and rename the copy to voodoo2a.dll.But instead of using the NFS3-provided file, you can get the file from the demo version of NFS:HS, You can download the complete demo from the Electronic Arts FTP site, but since it's a 14MB file, you may not like the idea. If that's the case, I've provided a 44KB .ZIP file containing only the dll which is available here. Replace both the original d3da.dll and voodoo2a.dll files with this one.
What needs to be done now is edit the shortcuts created by the installation program, by right-clicking on the icons and then selecting the "properties" tab, and then add the "-voodoo2" parameter to the command line. Click on the image to the right to see what it should look like.
After you do this, press the "OK" button. Repeat for each of the shortcuts created during the installation. After that, you're ready to play the game at higher resolutions.
The missing step:
My mind may be playing tricks on me, but I believe previously I was able to get 24 or 32-bit color depth (yes, unfortunately the procedure described provides you with up to 1280x960 resolution, but only at 16 bits with Z-buffer enabled). Unfortunately, I cannot remember what needed to be done to achieve this. Nevertheless, I think it provided you with greater color depth but not with higher resolutions (you were still limited to 800x600 maximum), so in light of that the current solution may be more practical.If I'm ever able to remember how it had to be done, I'll be adding the description here. For now, just enjoy the game with what we've just achieved!